GitHub Pull Request Checklist
Date Published: 14 February 2017
Last updated: 13 October 2023
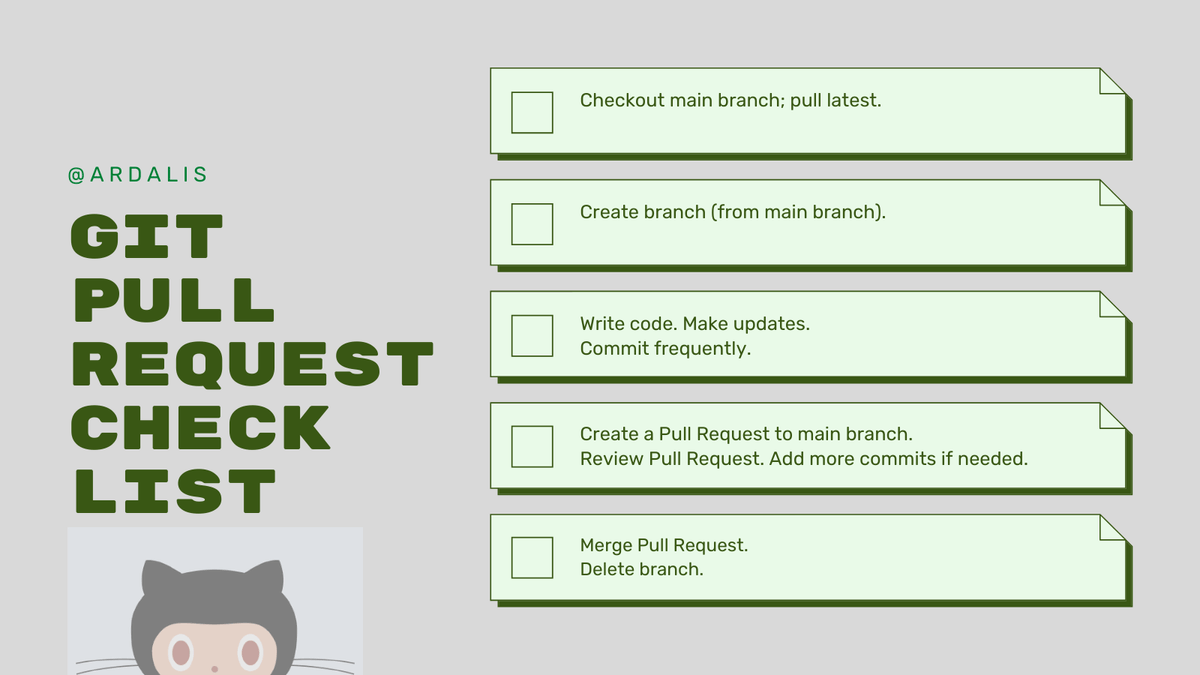
I really like the workflow that GitHub Pull Requests allow. It’s great even in tiny projects to be able to get a code review for a given set of changes, and the UI for GitHub’s Pull Requests is better than any other source control system I’ve used (and doesn’t require buying an expensive tool or client software). However, if you’re new to pull requests, there are a few moving parts, so it can be easy to miss a step or get confused. Here’s a quick checklist to follow to make sure you’re following the right process.
Step 1. Start from main
Assuming your main branch is called main (or commonly dev), make sure on your local machine you start there. It should have your latest good code from you and your team. Your main branch might be dev or something similar. Whatever it is, start there, and make sure you have the latest version (you can do a git pull to achieve this, or sync in GitHub For Windows or another tool).
Step 2. Create a branch for your work
From your main branch, create a new branch. In most clients this will also switch you to the new branch. If you’re operating from the console, you can do this:
git checkout -b my-new-branch
If you’re on a team and you want your branches to be organized separately from your teammates, a common practice is to use your username as a pseudo-foldername. So I might use "ardalis/my-new-branch" or "ssmith/my-new-branch". Many git clients will then organize the branches in folder structures based on these prefixes.
Step 3. Write Code
Now you’re ready to do whatever work you were planning on. Open up Visual Studio or your editor of choice and make your changes.
Step 4. Commit Often
Any time you make some progress (code compiles, tests pass) or you just want to save where you are (end of the day, lunchtime), make a commit. Your client should make this simple, or from the command line:
git commit -m 'Another test passes'
Sync your changes with GitHub periodically. In many clients you can check a box to automatically push changes as you commit them, or you can use the 'Sync' button in GitHub for Windows and other clients. From the command line, this works, too:
git push
The first time, you may need to set the upstream branch - the command line tool will tell you the command to use.
Step 5. Create a Pull Request
When you’ve completed the work you set out to do in this branch (created a feature, fixed a bug), it's time to merge your work back into your main branch. You do this with a Pull Request, which you can create either from your client (e.g. in GitHub for Windows there’s a big button for it; in SourceTree you can right-click on the branch to do it) or from the GitHub web site for your repository. If you navigate to your repository after pushing changes, you should see a dialog from GitHub asking if you want to create a new pull request for your branch to its parent – usually this is what you want.
When creating the pull request, you should give it a name that is probably similar to your branch. If your branch was “fix-login-bug” then your PR name might be “Fixed Login Bug”. If there is actually a GitHub issue associated with this problem, you can refer to it in the pull request by number. For instance “Fixes #123”. This will render as a link to that issue, and when this pull request is closed, it will close that issue as well.
Step 6. Review the Pull Request
Have a teammate (or you if no other option) review the pull request. A pull request is a conversation. When I first started working with this model, it wasn’t totally clear to me that a pull request wasn’t a snapshot in time. I thought that, once the PR was made, I was free to keep making changes and updates and committing (on the same fork or branch). While it’s true that you can keep working while a PR is in progress, you need to do it on a different branch. The branch from which you’ve made the pull request is a part of the pull request, and any changes made to it will appear in the conversation 'thread' of the PR. Here’s an example from the ASP.NET Core documentation repository:
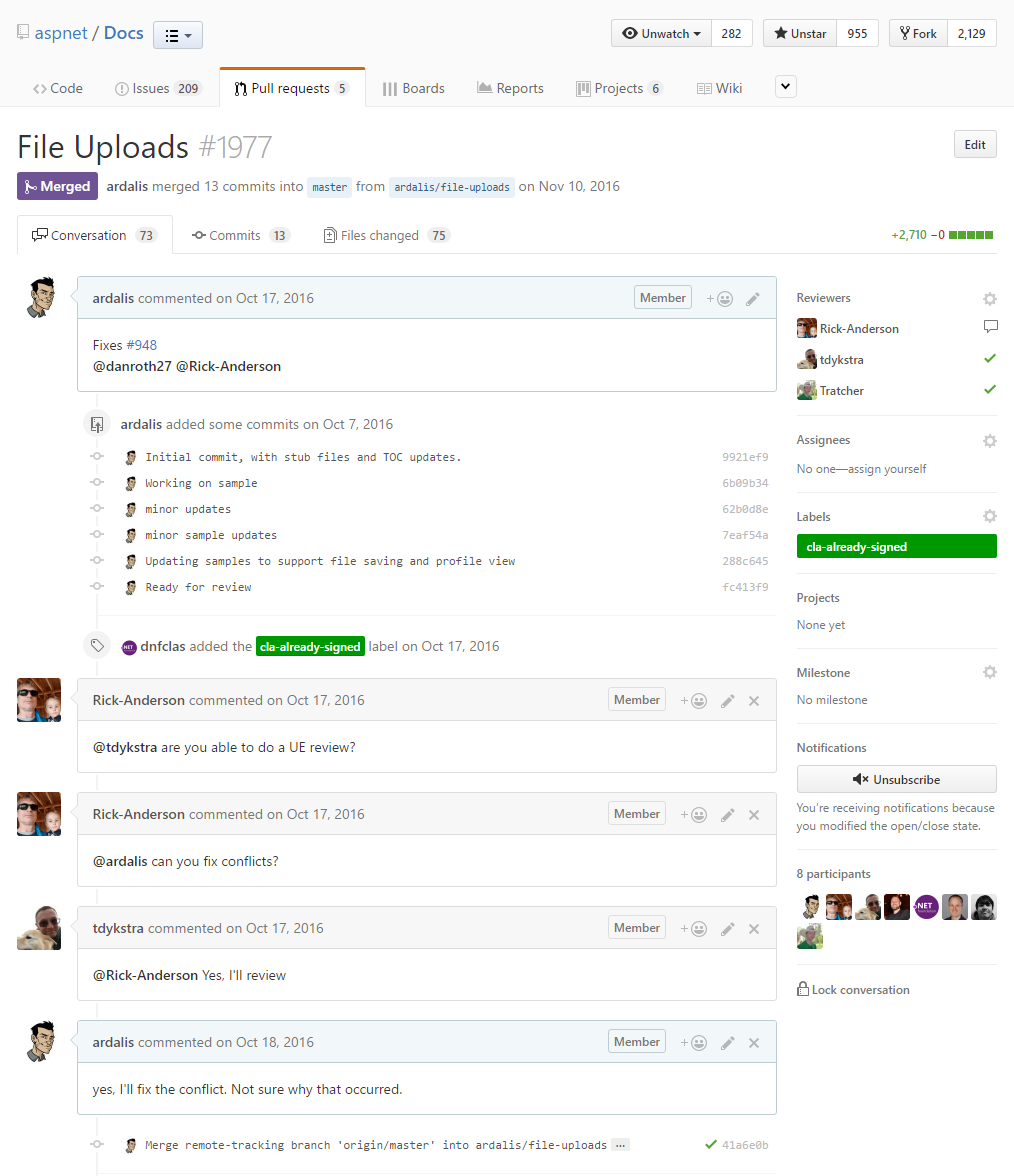
Notice in the Conversation tab that there are 73 comments. You can do quite a bit of code review in a pull request, and iterate over many small or even large changes. In this case, the content is a documentation article, but pure code reviews often involve just as much discussion. GitHub PRs now support the notion of Reviews explicitly (a relatively new feature), so you can request a review from a team member when you create a PR. You can also configure your repository to only allow merging if the PR has been reviewed. Additionally, you can set it up to only allow merging if an automated build succeeds, which this repository is also configured for (view it and scroll to the end to see the build status reports).
Step 7. Merge
Once you’re happy with the code, and perhaps you’ve had a reviewer Approve it, you’re ready to merge. In GitHub, you can configure what the big green merge button does, allowing only merge commits, squash and merge, or rebase merging (or any of them):
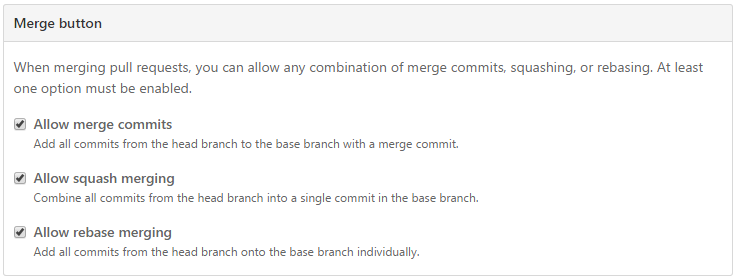
If you have strong feelings about which style of merging you want your repo to use, pick just the one(s) you want. Make it easy for your team to do the right thing when they click 'big green merge button':
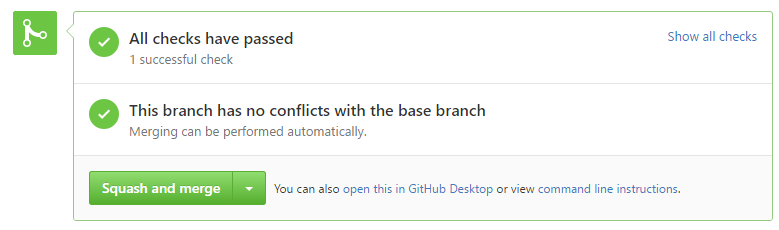
Assuming there are no conflicts and all of your checks have passed, you can click the button.
Step 8. Delete Branch
After clicking the button, it's safe to delete your branch on GitHub. You'll still have a copy of the branch locally, which you can keep around for as long as you like. At some point, you'll probably want to delete it, too (perhaps using git fetch --prune).
Step 9. Repeat
Go back to step 1. You can quickly do this from the command line:
git checkout main
git pull
This is especially important if you’re working on a team, since this is how you’ll make sure you’re getting others’ changes pulled down to your local repo. You want to do this frequently to avoid having your work diverge too much from the rest of the team’s (making a future merge more difficult).
Working from a Fork
There are a couple of additional steps if you're working on a fork of a repository that you're contributing to, as opposed to directly on the repository. You will need to periodically update your fork with changes made to the "upstream" repository. See Syncing a Fork of a GitHub Repository with Upstream for details, and do this at the start of each cycle through the checklist.
Summary
This may seem like a lot of work, but that’s only because I’m being very explicit and am offering some tips and explanation along the way. The basic steps aren’t that much different from working with a non-distributed source control system, where you would still need to get latest, check out, do work, check in, and maybe somewhere in there deal with merging and code reviews. The beauty of this process is that your code reviews are built into it and (if you set up a build server properly) it’s very unlikely anything will break your build since you can verify PRs before they’re merged into your main codebase.
Update
Damien Bod has a great article on Contributing to OSS Projects on GitHub using Fork and Upstreams. My checklist above is more designed for a team of committers than for community members forking projects and then sending in their contributions. Read Damien’s post for more on the latter process.
Want a tip like this one every Wednesday? Sign up for my Weekly Dev Tips.
Category - Browse all categories

About Ardalis
Software Architect
Steve is an experienced software architect and trainer, focusing on code quality and Domain-Driven Design with .NET.