Unit Test Naming Convention
Date Published: 10 January 2011
I’ve been writing tests and unit tests for quite a while, and naturally my personal preference for naming them has evolved somewhat with time. Initially, I didn’t really know what I was doing and the default organization tended to be something like “given a class, Customer, all of the tests will go into a class called CustomerTests.” This turned out, for me at least, to be less than ideal. Later I learned more about BDD and specifications and I decided I could apply some of the same context and scenario information to my test organization as well. Thus, I began striving to write my test classes such that each one described a particular scenario, and each test described a particular variation within that scenario (e.g. happy path, sad path, etc.).
By way of example, consider an e-commerce module that includes a pricing calculator. One particular scenario for the pricing calculator might be to deal with a “preferred customer” who gets a special discount. Others might be for regular customers, and still others for dealing with high volume orders or wholesale customers. If I were to name my classes the way I did when I first started writing tests, I might have a PricingCalculatorTests class, which in turn would have many dozens of tests in it. However, using my current preference, I might have classes like PricingCalculatorGivenNormalCustomerShould, PricingCalculatorGivenPreferredCustomerShould, PricingCalculatorGivenWholesaleCustomerShould, etc. If I find that there are a great many such classes, then of course you can use namespaces and folders to keep things well organized.
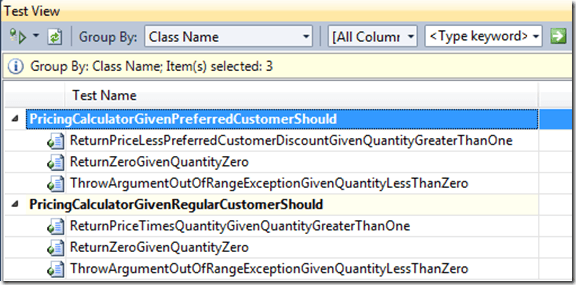
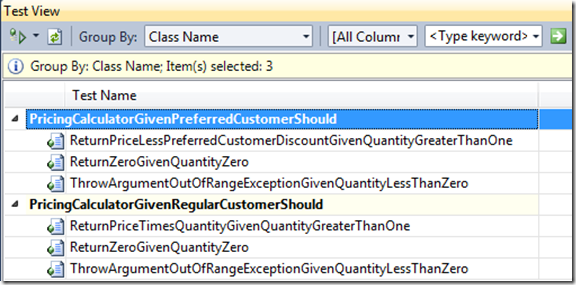
When using this style of test naming, the Test View in Visual Studio becomes very easy to read. Simply change the default Group By to Class Name (or if you are putting scenario information into your namespace, consider using Full Class Name).
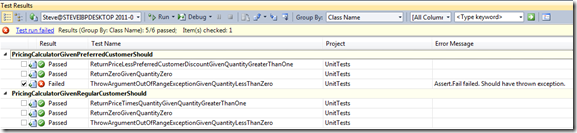
Test results can be grouped similarly:
I’ve written up a small sample showing this naming convention – download the sample project here. Below you can see one of the test classes in its entirety as well as the System Under Test, the Pricing Calculator.
PricingCalculatorGivenRegularCustomerShould.cs – Test Class
using System;
using Core;
using Microsoft.VisualStudio.TestTools.UnitTesting;

namespace UnitTests
{
    [TestClass]
    public class PricingCalculatorGivenRegularCustomerShould
    {
		private Customer _customer;
		private PricingCalculator _pricingCalculator;

		[TestInitialize]
		public void Setup()
		{
			_pricingCalculator = new PricingCalculator();
			_customer = new Customer {IsPreferred = false};
		}

		[TestMethod]
		public void ReturnPriceTimesQuantityGivenQuantityGreaterThanOne()
		{
			// Arrange
			int units = 1;
			decimal unitPrice = 2.50m;

			// Act
			decimal calculatedPrice = _pricingCalculator.Calculate(units, _customer, unitPrice);

			// Assert
			decimal expectedPrice = unitPrice*units;
			Assert.AreEqual(expectedPrice, calculatedPrice);
		}

		[TestMethod]
		public void ReturnZeroGivenQuantityZero()
		{
			// Arrange
			int units = 0;
			decimal unitPrice = 2.50m;

			// Act
			decimal calculatedPrice = _pricingCalculator.Calculate(units, _customer, unitPrice);

			// Assert
			decimal expectedPrice = 0m;
			Assert.AreEqual(expectedPrice, calculatedPrice);
		}

		[TestMethod]
		[ExpectedException(typeof (ArgumentOutOfRangeException))]
		public void ThrowArgumentOutOfRangeExceptionGivenQuantityLessThanZero()
		{
			// Arrange
			int units = -1;
			decimal unitPrice = 2.50m;

			// Act
			decimal calculatedPrice = _pricingCalculator.Calculate(units, _customer, unitPrice);

			// Assert
			Assert.Fail("Should have thrown exception.");
		}
	}
}
PricingCalculator.cs – System Under Test
using System;

namespace Core
{
	public class PricingCalculator
	{
		public const decimal PreferredCustomerDiscount = 0.2m;

		public decimal Calculate(int units, Customer customer, decimal unitPrice)
		{
			decimal price = units*unitPrice;
			if (customer.IsPreferred)
			{
				return price*(1 - PreferredCustomerDiscount);
			}
			if (units < 0)
			{
				throw new ArgumentOutOfRangeException("units", "Units must be zero or greater.");
			}
			return price;
		}
	}
}
Summary
If you’ve bought into the idea that testing actually helps to improve the quality of the software you build, and you’ve further realized that automated testing is far more cost effective than manual testing, then it follows that you will need to organize your tests in some fashion. I have personally found the above technique to be useful in doing so on projects I work on. I don’t suggest that this technique will work everywhere for everyone, or that it is the ultimate such technique (especially given that it’s only the latest in a series of different conventions I have adopted). However, it remains my current favored approach because it produces easily understood tests whose classes tend to follow the Single Responsibility Principle and Open/Closed Principle, as well as producing output that is easily understood by everyone on the development team as well as by business stakeholders.
Update for 2016
I’ve been using this convention for a long time. One thing that I find useful now is to use more files and folders (and often fewer test projects). So, I might have a single test project, and within it folders relating to each of the project I might have tests for (e.g. Core, Infrastructure, Web). Even if I only have one project I’m testing, I’ll probably have folders in the test project corresponding to the folders in the project I’m testing (e.g. Model, Services, Exceptions, EventHandlers). Within the folder corresponding to where the class I’m testing lives, if the class has just one method worth testing, I’ll just create the ClassFooMethodBarShould.cs file there. However, if it has many methods, I’ll create a folder for the class, and put the individual method-based test classes within this folder. Here is the one instance where I deviate from my usual rule about not calling things “SomeClassTests” – I typically will use this for the foldername where the class’s test files are. The reason is simple: if I use the class name, and then use the class name as the namespace, it makes life difficult when trying to reference the class-under-test.
For example, say I have MyProject.Core.Entities.Customer that I want to test. I have a test project called MyProject.Tests. I’ll create folders Core and in it Entities. If Customer has only one method I’m testing, I’ll put CustomerDoSomethingShould.cs in the Entities folder. However, once I get a second method for Customer to test, I’ll create a folder CustomerTests, and put classes in that folder. At that point, I’ll also frequently drop the class name from test classes, since it’s in the namespace (more or less). The end result might be fully qualified test class names like:
MyProject.Tests.Core.Entities.CustomerTests.DoSomethingShould
MyProject.Tests.Core.Entities.CustomerTests.DoSomethingElseShould
etc.
Update for 2019
I’m generally dropping the ‘Should’ suffix now and instead changing the tense of the method name so:
CalculatorAddShould.ReturnSumGivenTwoIntegers
becomes
CalculatorAdd.ReturnsSumGivenTwoIntegers
It’s a small change but it makes every test name a little shorter and thus easier to read and fit into test windows.
Category - Browse all categories

About Ardalis
Software Architect
Steve is an experienced software architect and trainer, focusing on code quality and Domain-Driven Design with .NET.