Working with Ivy Bridge Ultrabook Sensors
Date Published: 05 December 2012

I’ve had Intel’s preview Ivy Bridge Ultrabook for a little over two months now. It’s a preview device with a few pre-production quirks, but it’s also a powerful developer machine in a small, lightweight package, complete with a very responsive touch screen that works great with Windows 8. You can readmy first impressions of the device, as well as my first follow-up review.
In this last write-up, I wanted to go a little bit deeper into the sensors that come with the device. As programmers, we can easily incorporate these sensors into our applications, especially Windows 8 apps. I’ve already described the variety of sensors the device supports. To get started with coding against these sensors, first, make sure you have the latest drivers for your machine. Especially right now, a lot of these devices are brand new and updates are happening frequently. Next, I recommend you grab the Windows 8 App Samples kit, which includes 145 different samples (not all relating to sensors, but still, that should keep you busy for a while).
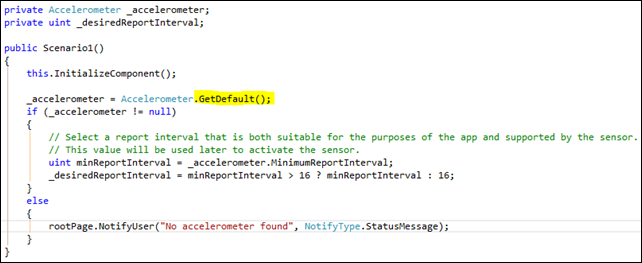
Let’s take a look at a couple of these samples, and the code they provide. First, let’s take a look at the Accelerometer sensor sample code, which is pretty typical for all of the other sensors. First, we need to get an instance of the sensor, which we do by calling the GetDefault() method:
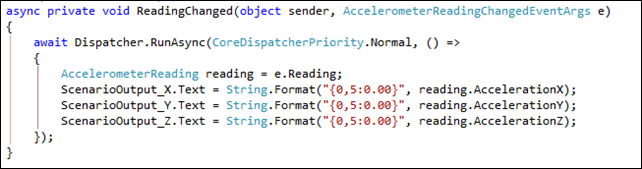
Next ,we can pull individual readings from the sensor, like so:
When run, the live sample looks like this (here I’ve tipped the laptop up on its left side):
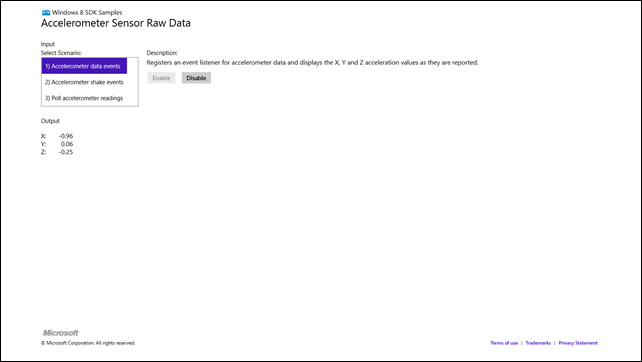
You can see the X axis reading is showing almost –1, because of how I’ve tilted the laptop. When it’s at rest on a horizontal surface, the readings for X and Y are nearly zero, while the Z axis is –1. Essentially, when no external force apart from gravity is pulling on the device, gravity is what you’re detecting. When it’s resting flat, you can think of the X axis as starting at your caps lock key and proceeding toward your enter key, while Y is starting at the touchpad and proceeding toward your screen. Z is passing vertically through your keyboard. So, if you hold the laptop upside down, Z flips to positive 1. It would be interesting to see the readings this thing would have in a fighter jet…
As a bit of trivia for you physics buffs, what would the readings be if I tossed the laptop into the air, while it’s rising, while it’s at its peak, and while it’s falling, assuming it stays perfectly flat so we’re only concerned with the Z axis?
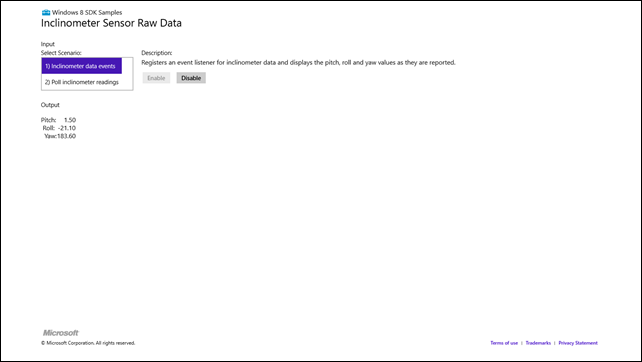
Related to the accelerometer is the inclinometer sensor, which you can read similarly (so similarly I’m not going to waste time showing you screenshots of the code). The main difference is that the resulting readings are Pitch, Roll, and Yaw. For these, you can pretend your laptop keyboard is an airplane, with its tail at the touchpad and nose by the screen. Lifting the tail results in negative pitch. Lifting either side results in a Roll change. Yaw is where things differ from the accelerometer, as this refers to rotation along the Z axis. That is, if you leave your laptop flat on the table, but turn it, that’s changing Yaw (read more on flight dynamics terms).
Here’s the app running with me picking up the right side of the laptop.
You can see how you could build games to take advantage of these sensors, especially in a tablet form factor.
There’s also a compass, which you access like the other sensors shown. Its event handler looks like this:
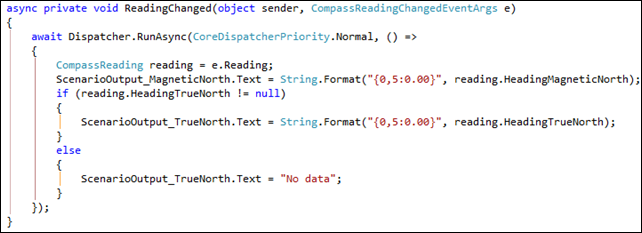
On this laptop, the “needle” of the compass seems to point out the right side of the keyboard, as that’s what I had to point north in order to get a 0 degree reading. When used in a tablet form factor, that probably makes the most sense (for it to come out of the top of the tablet).
The gyrometer provides similar readings of X, Y, and Z axis values based on angular velocity. At rest, these all read zero, but if you move the device, they’ll show you the instantaneous effects. The API is identical to the accelerometer and inclinometer APIs.
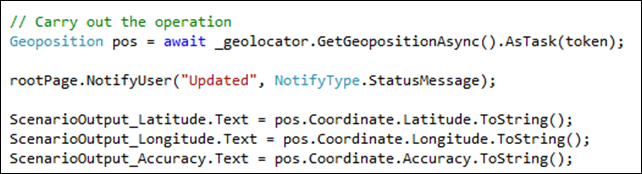
Working with the GeoLocator (GPS reader) is slightly different. You can simply instantiate one of these classes to start working with it. The code to pull the location data from the GeoLocator instance looks like this:
Finally, the LightSensor lets you detect ambient light. You access the sensor just as with most of the other sensors (like the accelerometer), and its event handler yields a single LUX value:
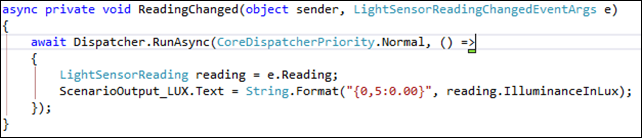
You can use this sample to locate the light sensor on your device, if you don’t know where it is (on this laptop, it’s by the integrated webcam at the top of the screen). If you cover the sensor, the reading drops to 0. The brightest I could get it to read from some indoor lighting (at night) was just over 20,000, but that was held right up to a light bulb. A “normal” reading as I use the laptop seems to be around 15-20, depending on whether there is direct light on the sensor.
Summary
As you can see, there’s a lot you can do with the sensors that ship in this device, and I’m sure other devices designed for use with Windows 8 will have many of these sensors as well. The code for detecting whether a sensor is present and available is of course included in these samples as well, since obviously not every device will support every sensor. You can read more on this topic from other bloggers like John Papa and Scott Hanselman. I hope you found this interesting, and if you have an ultrabook you recommend, please share it in the comments (I’m looking at the Lenovo Yoga, for instance, but I haven’t bought one yet). And feel free to debate the physics question I proposed, too.
Category - Browse all categories

About Ardalis
Software Architect
Steve is an experienced software architect and trainer, focusing on code quality and Domain-Driven Design with .NET.