Installing Graffiti Extras
Date Published: 08 December 2008

I’ve been wanting to add Next/Previous links to my blog’s posts to provide easier navigation for folks who come to the blog and find themselves somewhere in the middle of it. My goal is for the top and/or bottom of each post to have something like this:
<<Blog Post Title|Blog Post Title>>
Most likely my designer will make it look better than this, of course. A quick search revealed that Graffiti Extras includes this functionality. I thought I’d grab the Binary release and fired up my FTP client and was ready to do things the old-fashioned way when I discovered the Package option is actually a much easier way to go. What’s a package? Well, Keyvan has a nice overview of creating and using Graffiti CMS Packages here. Long story short – it’s a zipped folder of files that’s been encoded into an XML format so that you can upload a single, plain text file all in your browser to install addins. After uploading the package, Graffiti presented me with the following:
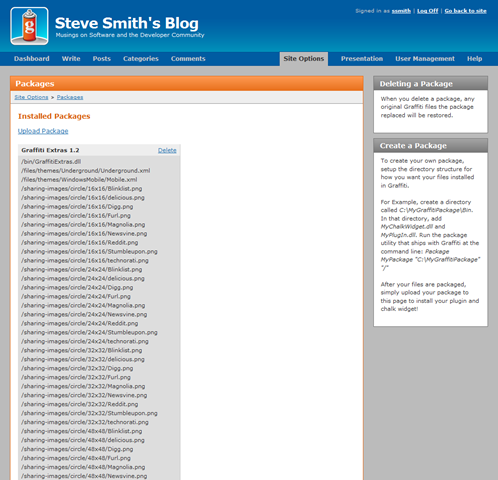
Too easy.
Don’t forget to go to Site Options > Plug-Ins and Enable the extension.
My next step is to actually get the Post Navigation stuff working. Keyvan was nice enough to point me to this post on using the Post Navigator Extension. Most of this post talks about writing the extension itself (that would be the C# code) – since this is already done and I’m just hooking into it via Chalk in my themes, I only care about the bottom of the post:
$postNavigator.GetNavigator($post, "Previous", "Next")

or

$postNavigator.GetNavigator($post, true, true, " | ", "", "", "<< ", " >>")
Doh!
Only one problem – it doesn’t work with the default VistaDB database, which is the one I’m using. Keyvan’s promised me a quick fix for this – I’ll post an update when I get it working.
Update
Keyvan fixed the issue and updated CodePlex’s source – the distribution downloads should be updated soon as well. Here’s what mine looks like now:

Here’s the code I had to use (some line breaks added for this post):
<span style="color: #0000ff"><</span><span style="color: #800000">div</span> <span style="color: #ff0000">class</span><span style="color: #0000ff">="nextprevious"</span><span style="color: #0000ff">><</span><span style="color: #800000">div</span>
<span style="color: #ff0000">class</span><span style="color: #0000ff">="previous"</span><span style="color: #0000ff">></span>$postNavigator.GetNavigator($post,
true, true, "<span style="color: #0000ff"></</span><span style="color: #800000">div</span><span style="color: #0000ff">><</span><span style="color: #800000">div</span> <span style="color: #ff0000">class</span><span style="color: #0000ff">='next'</span><span style="color: #0000ff">></span>", "", "",
"← ", " →")<span style="color: #0000ff"></</span><span style="color: #800000">div</span><span style="color: #0000ff">></span>
<span style="color: #0000ff"></</span><span style="color: #800000">div</span><span style="color: #0000ff">></span>Tags - Browse all tags
Category - Browse all categories

About Ardalis
Software Architect
Steve is an experienced software architect and trainer, focusing on code quality and Domain-Driven Design with .NET.