Excel 2007 Named Ranges and Data Validation
Date Published: 22 June 2009

It’s hard to find information on Excel Named Ranges for Excel 2007 using a search engine. The problem isn’t that there’s no information available, but rather that most of it refers to older versions of Excel. And of course, that would be fine, if Excel 2007 didn’t go and move everything around and add that darned Ribbon thing to make it impossible to find anything. But I digress.
Today I’m working on something in Excel and I want to be able to limit the available values the user can enter into a cell. Should be pretty easy, but I’m having a hard time finding how to do it and it’s been like 5 years since I had to do this so I’m searching for help. Of course, I’m probably not searching for the right terms when I say something like “limit column values excel” and get back a bunch of junk related to the maximum number of columns excel supports.
Once I remembered that these things are called Named Ranges I started to make some progress. What I basically wanted to do was let the user either type in or specify from a drop down list the values that were valid for the cell. It turns out that this is pretty easy to do by specifying a Named Range as the source of a List in the Data Validation. There are a few related tasks here, so let’s cover them one by one.
- Define a Named Range
- Limit Valid Entries In a Cell to a List of Values
- Delete and Manage Named Ranges
Defining a Named Range in Excel 2007
This is actually very easy, and allows you to later refer to the range by name rather than using its $A2:A17 nomenclature. For example, let’s say that you want to limit the Company Names listed in an Excel file to a particular collection of names (e.g. your customers). First, you probably want to put this list into a separate worksheet (which I’ll call Lookup) under a heading that describes the range. The following diagram shows an example:
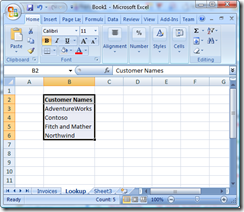
In this screenshot, I’ve highlighted the Customer Names as well as the actual rows of data, but be careful not to do this when you’re defining your Named Range (go ahead, ask me how I know not to do this… or go ahead and do it and you’ll understand why the third part of this post is on deleting named ranges).
So,highlight just the values you want in your named range. Then click on the white space just above the A column (where it says B2 in my screenshot above). This is called the Name Box. Type in the name for your range. It has to be just one word, no spaces. Let’s call mine CustomerNames, as shown below:
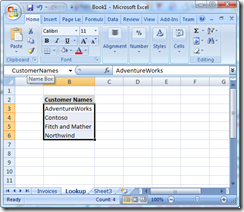
You’ve just defined a Named Range in Excel 2007.
Limit Valid Entries In a Cell to a List of Values
Now switch to your main worksheet (using the tabs at the bottom of the Workbook) which might look like this:
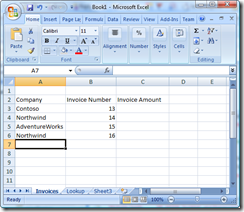
Note that in this example I’ve been entering in customer names by hand, with some duplication. If later on I decide to change Contoso to Contoso, Inc. and then I want to run some reports or show a pie chart displaying sales by customer, these will no longer be grouped together. It’s much better to use a named range to define the list of possible values (and of course this might ultimately come from a database or web service) than to have a lot of manually entered data that could be slightly off.
In Excel 2007, if you want to limit the values a particular cell can have, you should click on the cell (or range) and select the Data tab in the ribbon. Then click on the Data Validation button, which will bring up the dialog shown here:
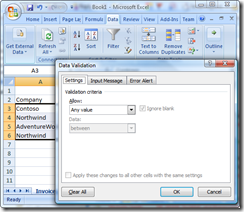
By default, cells can contain any value (no validation). In this case, we want to change this to use a list of values, so in the Allow drop down list, choose List. Then in the Source: field, put in ‘=CompanyNames’ replacing ‘CompanyNames’ with the name of your Named Range. Click OK.
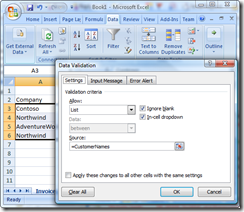
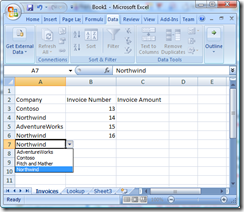
You can apply the Data Filter to the whole column – it will ignore any headers that currently don’t match (though you’ll be able to use the dropdown on these as well later should you wish to, or simply remove the validation from the header row manually afterward). Now to add a new row, you can click on the dropdown arrow or start typing and get autocompletion of the data, like so:
Delete and Manage Named Ranges
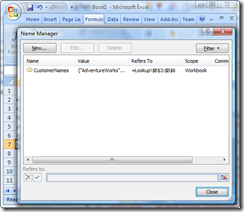
Now let’s say you accidentally create a Named Range that contains more cells than you would like, or that isn’t named what you’d like. You might think that you could redefine that range by highlighting a selection of cells and retyping that name into the Name Box. But no, that doesn’t work. Fortunately, there’s a very easy way in Excel 2007 to manage all of your Named Ranges once you know where to look for it (and no, it’s nowhere in the Data Validation section where thus far we’ve been working with Named Ranges). The trick is to go to the Formula tab on the Ribbon (because frequently Named Ranges are used in Formulas, I suppose). There you will find a Defined Names section which includes a Name Manager. The Name Manager, as you might guess, makes it quite easy to add, edit, and delete Named Ranges from within Excel 2007.
Summary
Named Ranges are a handy feature in Excel. Finding out how to work with them in Excel 2007 if you’re familiar with Excel 2003 or earlier can be a challenge. With any luck, this post will help a few folks out or at least serve to remind me how to do this the next time I need to remember it.
Tags - Browse all tags
Category - Browse all categories

About Ardalis
Software Architect
Steve is an experienced software architect and trainer, focusing on code quality and Domain-Driven Design with .NET.
