Create a Windows Service in .NET That Can Also Run as Console Application
Date Published: 13 April 2011

I’m creating a simple windows service using Visual Studio 2010 and .NET 4. I want to be able to easily test it by simply running the resulting exe without the need to install the service. I did some research on this topic and found three helpful articles:
- HybridService: Easily Switch between Console Application and Service (on CodeProject)
- Run Windows Service as a console program
- Creating a windows service in visual studio 2010 (in VB)
I found that the first article was a bit more work than the second. In the end, I pretty much combined the latter two articles’ approaches and created a simple template (in C#) that can be used as a starting point for any long-running windows service. It’s still a work in progress, but I figure this will probably give some folks a head start and also is an opportunity for folks to tell me what I’m doing wrong.
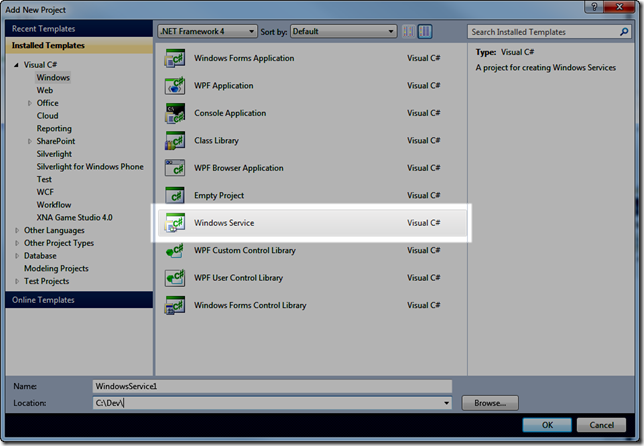
To start, create a new Windows Service Project:

Once that’s done, you should have a Program.cs and a Service1.cs file in your project. You can delete the Program.cs file. Edit the Service1.cs file as follows:
using System;
using System.Diagnostics;
using System.ServiceProcess;
using System.Threading;
using System.Timers;
using Timer = System.Timers.Timer;

namespace  ScheduleService
{
    public partial class ScheduleService : ServiceBase
    {
        private static readonly object lockobject =  new object();
        private  Timer _timer;

        public ScheduleService()
        {
           InitializeComponent();
        }

        private static void Main(string[] args)
        {
             var service = new ScheduleService();
             if  (Environment.UserInteractive)
             {
                 service.OnStart(args);
                 Console.WriteLine("Press any key to stop the program");
                 Console.Read();
                 service.OnStop();
             }
              else
             {
                 Run(service);
             }
         }

         protected override void OnStart(string[] args)
         {
             _timer = new Timer();
             _timer.Enabled =  true ;  // call the Elapsed event
             _timer.Interval = 5000;  // in milliseconds
             _timer.AutoReset =  true ;  // keep calling elapsed method.
             _timer.Elapsed += _timer_Elapsed;
             _timer.Start();
         }

         private void _timer_Elapsed(object  sender, ElapsedEventArgs e)
         {
              lock  (lockobject)
             {
                 _timer.Stop();
                 ExecuteStep();
                 _timer.Start();
             }
         }

         private void ExecuteStep()
         {
             Debug.Print("Executing...");
             Thread.Sleep(1000);
             Debug.Print("Done.");
         }

          protected override void OnStop()
         {
         }

     }

 }
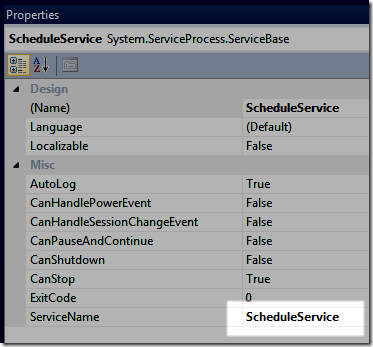
You’ll also want to rename the ServiceName property, which you can access from the Designer View of the ScheduleService.cs class (or Service1.cs if you haven’t renamed it yet).

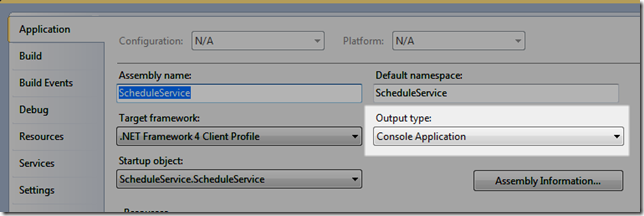
If you run this without doing anything else, you will most likely get an error telling you that you have to install the service. The last bit you need to do is change your project properties to Console Application.

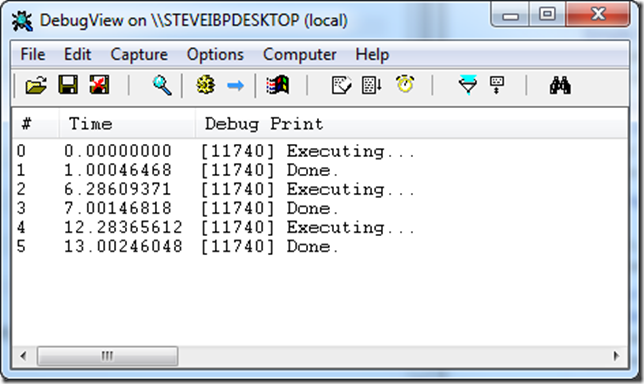
Once that’s done, you should be able to run the resulting EXE, and you will see a simple console window appear, saying “Press any key to stop the program”. Also, if you use a tool like DbgView from SysInternals to watch your debug output, you will see something like this:

A couple of things to note here:
- My service doesn’t kick off every 5 seconds.
- It kicks off 5 seconds after the last time it ran. This is important because if I have more than 5 seconds of work to do, I don’t want two instances of my service running simultaneously and stepping on one another.
For my specific use case, it’s very likely that when there is something to do, it will take much longer than 5 seconds to do it, but I don’t want my interval between checking for work to be longer than 5 seconds, so this works very well. If your requirements are different, and you absolutely need your service to do something at specific fixed intervals, then you’ll want to revise this design, and perhaps consider looking into something like Quartz to manage the scheduling aspect of your needs.
Category - Browse all categories

About Ardalis
Software Architect
Steve is an experienced software architect and trainer, focusing on code quality and Domain-Driven Design with .NET.
