The Check In Dance
Date Published: 29 September 2010

When developing software and working with a build or integration server, there are certain conventions that one should follow when making updates to the shared codebase. Somewhere I picked up the term “the check in dance” (not to be confused with “the chicken dance”) for this process, which is very straightforward and, if followed, can ensure that build failures on the continuous integration (CI) server are a rarity.

Automating the Build
Before we get into the process of properly checking in code for a build server to work with, let’s briefly talk about how one automates a build, and why this is a good thing. If you’re using Visual Studio, automating a build with MSBuild (or if you prefer, NAnt) is not difficult. The basic steps you need to create a script that will build your solution, run your unit tests, deploy your database project, run your integration tests, and then build everything in release mode, can be found in my article on build automation using MSBuild. About the only things not covered there are setting up your build server (I do mention TeamCity; Team Build also works great as a CI server these days) and how to deploy from your build server to your production environment (more on that later, perhaps).
At this point, let’s assume that you’re able to run the same build script on a build server as you run on your dev machine, and that it is automatically triggered in classic CI fashion on each check-in. How can you prevent breaking the build?
Step One: Fix the Build!
It’s very important, if you’re going to bother dedicating hardware and time and other resources to *having* a build server, that you treat it like it’s important. When the build breaks, make sure everybody knows it and it IS NOT OK. It should be a rare event, like an earthquake or a fire drill, that gets the dev team moving quickly. Remember, when the build is broken, you can’t deliver software. Effectively you’ve stopped production, even if some developers are still happily coding away on their local versions, unknowing or uncaring how the broken build might impact the changes they’re in the midst of.
Step Two: When the Build is Green, Update Your Local Copy
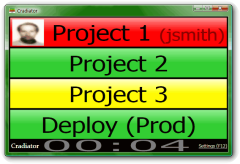
It’s worth checking that the build is green before doing an update if it’s a frequent occurrence for it to break. If it’s a very rare thing for the build to be broken on the build server, you can perhaps afford to be less diligent. In any case, you should always know the status of the build through information radatiors like CCTray or Cradiator. Note that you can easily hook up either/both of CCTray and Cradiator to TeamCity as I’ve shown in another article.
Step Three: Make your Updates
Implement that feature. Fix that bug. Refactor that code. Write and run tests to prove that all of the above worked. Get ready to check in a small unit of work that adds incremental value to the project. But don’t check it in yet!
(Optional) Step 3.5: Acquire the Integration Token
On some teams, an integration token is passed around from one developer or pair to the next as they are ready to make updates. The token is usually something small but obvious that can easily be tossed around the team room, like a stuffed animal or ball, and whichever developer, pair, or workstation possesses the token is the only one allowed to check in. Etiquette dictates that you only request the integration token when you are prepared to check in immediately, so that the bottleneck imposed by this pessimistic lock is minimized. These don’t tend to be as popular on large or distributed teams, but for smaller teams who are following the agile principle of being physically co-located, it can be very helpful.
Step Four: Update Your Local Copy, Again
Yes, again. Someone else may have made updates that affect yours, and it’s best for you to find that out now, on your machine, and fix any issues that arise from it than for you to check in blindly, relying on the build server to catch the issue. Finding and fixing such issues yourself requires discipline and professionalism. Throwing it in and hoping it works is lazy and inconsiderate. I say this honestly, even knowing full well that even today I don’t always do the right thing. But I know what the right thing to do is. Strive to do the right thing, and your team will thank you.
Step Five: Run The Build Script Locally
You should have a ClickToBuild.bat (or similar) script that you run locally that builds everything and runs all tests. Run it now. Make sure everything is green. Fix any issues. Since frequent checkins are desirable, you can see why it’s important to keep your builds and your tests fast. If you can’t tolerate the time required to run your integration tests with every checkin, you may opt to only run those on the build server, or only nightly. However, the more often you can run them, the more valuable they’ll be, so time spent speeding them up (or eliminating them in favor of unit tests) is time well-spent. Also, be sure to run unit tests before integration tests, since they’re much faster and that way your build can fail fast.
Step Six: Check in
Check in your code. At this point, this should not be a very dramatic event. You already know the build is going to succeed. If it does, you’re done. If not, continue.
Step Seven: Fix the Build
If the build failed, fix it immediately. If there is some very obvious issue that somehow slipped in, correct it and check in again. If, however, you’re not sure what the problem is, roll back your change and check in the previously working code again. Once the build is green again, work on analyzing what went wrong. Don’t let the build stay broken for more than a few minutes while you’re trying to debug the issue – make it green, then worry about why it was red.
Integration Token (if used)
If you’re using an integration token (see step 3.5), you’re now done with it. If someone else has requested it and is waiting for it, toss it to them. Otherwise, you keep it unless and until someone else requests it.
Summary
If you follow this check in procedure (the check-in dance), it will become increasingly rare for your build server to fail, and your team’s confidence in their ability to produce working software will increase as well. Further, if you’re building an application that can be deployed at any time (e.g. most web applications), you will find that it’s no longer a big deal to try and get ready for a deployment. With the build green, you should be able to run a single script or click a single button to deploy the code to a staging and/or production environment. With increased confidence in deployments, you should be able to deploy more frequently, resulting in a tighter feedback loop and more value being delivered more rapidly, as well as issues from the field coming in much closer to when the code that caused them was written (making bugs easier to reproduce and correct).
Category - Browse all categories

About Ardalis
Software Architect
Steve is an experienced software architect and trainer, focusing on code quality and Domain-Driven Design with .NET.